
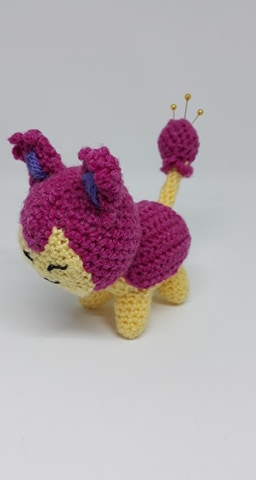
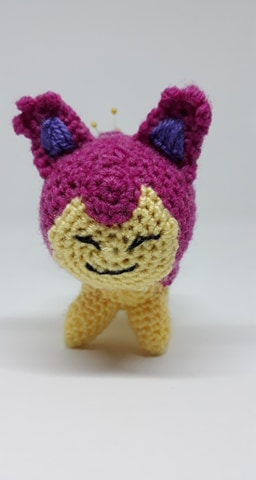
SKITTY CROCHET PATTERN
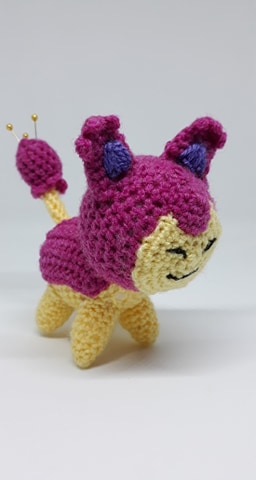
I made a Skitty quite a while back for a good friend of mine as this is one of her favourite Pokémon, she said she couldn't find a plush of one that she liked so I made her one! Safe to say it was very well received, so why not share the pattern so you lovely crafty lot can make one too :)
Materials
4mm crochet hook
4 ply yarn in Dark Pink and Pale Yellow
Purple felt OR yarn (for insides of ear)
Black embroidery thread
Toy stuffing
OPTIONAL 3 pins will Yellow tips
Abbreviations
SC – Single Crochet
INC – Increase
DEC – Decrease
PICOT - Ch however many specified, slst into 1st ch
** - Repeat around
Pattern
Head – Pink
Magic Ring 6 (6)
1 Inc around (12)
2 *sc, inc* (18)
3 *2 sc, inc* (24)
4 *3 sc, inc* (30)
5 *4 sc, inc* (36)
6 – 11 Sc around (36)
12 *4 sc, dec* (30)
13 *3 sc, dec* (24)
14 *2 sc, dec* (18)
15 *sc, dec* (12)
- Finish off, stuff and leave a long tail for sewing
Body – Pale Yellow
Magic Ring 6 (6)
1 Inc around (12)
2 *sc, inc* (18)
3 *2 sc, inc* (24)
4 *3 sc, inc* (30)
5 – 12 Sc around (30)
13 *3 sc, dec* (24)
14 *2 sc, dec* (18)
15 *sc, dec* (12)
16 Dec around (6)
- Finish off, stuff, tie end neatly closed
Legs (x4) – Pale Yellow
Magic Ring 6 (6)
1 *sc, inc* (9)
2 Sc around (9)
3 *2 sc, inc* (12)
4 – 6 Sc around (12)
- Finish off, turn inside out and stuff lightly
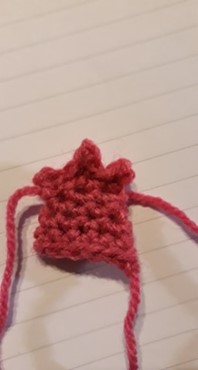
Back Plate – Pink
This part is worked in the flat, don’t forget to CHAIN 1, TURN at the end of each row.
Chain 13, Sc in 2nd loop from the hook and sc back to the starting ch. (12)
1 – 3 Sc across (12)
4 dec, 8 sc, dec (10)
5 dec, 6 sc, dec (8)
6 – 9 Sc across (8)
10 inc, 6 sc, inc (10)
11 inc, 8 sc, inc (12)
12 – 14 Sc across (12)
Put in a stitch marker at the end of R14, then SC around the entire outside of this piece to give it a nice, smooth finish.
Ears (x2) – Pink
Magic Ring 6 (6)
1 *sc, inc* (9)
2 Sc around (9)
3 *2 sc, inc* (12)
4 Sc around (12)
- Finish off, turn inside out and do not stuff
On the tip of the ear, PICOT STITCH using PINK to make the 3 tuft bits. PICOT 3, 3 times.
Tail – Pink
Magic
Ring 6 (6)
1 *sc, inc* (9)
2 *2 sc, inc* (12)
3 *3 sc, inc* (15)
4
– 5 Sc around (15)
6 *3 sc, dec* (12)
7 *2 sc, dec* (9)
- Change to Pale Yellow -
8 *sc, dec* (6)
9
– 14 Sc around (6)
-
Finish
off, stuff the tip of the tail lightly and leave a long tail for sewing.
Tail
Frills
Take
up your pink yarn and insert your hook into the tail where the colour change
is. Slip Stitch some yarn through.
Now,
using Surface Crochet:
Chain
3, SLST into next stitch. Continue doing this all around the tail to create the
little frills at the base of the pink section.
Face (Part 1) - Pale Yellow
Magic
Ring 8 (8)
1 Inc around (16)
2 *sc, inc* (24)
3 *2 sc, inc* (32)
4 *3 sc, inc* (40)
- Finish off, leave a long tail for sewing
Part 2 - Pink
Magic
Ring 6 (6)
1 Inc around (12)
SLST – Finish off. Leave a long
tail for sewing
Assembly
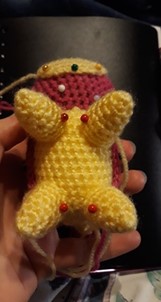
You may want to pin the entire plush together before you start, this is what I did for my Skitty as I found it helped with placements.
Start with the body.
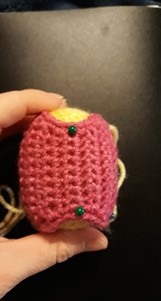
Take the back plate and neatly pin it down, when it’s in place
sew on as neatly as possible.
Take the legs and pin them in place - making sure that Skitty can stand upright - then neatly sew them on.
Next, take the tail and pin it to the body, where the back
plate goes in at the middle.
When this is in place, sew.
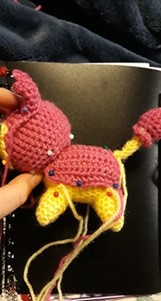
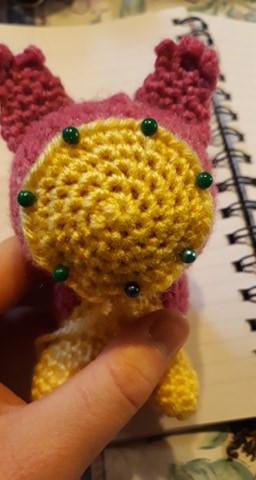
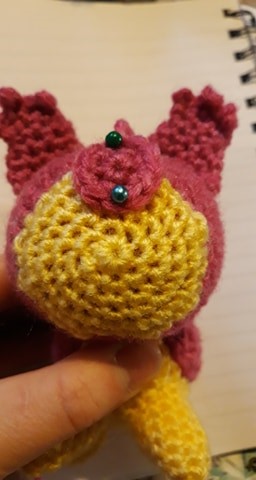
Moving on to the head – pin the ears on to the top of the head, then pin the face on.
Pin “part 1” on first and sew, then pin “part 2” of the face at the top of “part 1” to give it the iconic crescent shape. Sew the ears on when you're happy with the placements.
Pin the head to the body and make sure Skitty can stand on its own again. Sew the head in place.
Time for the inner ear. I personally embroidered the insides of the ears for my Skitty, but using felt or needle felting will also work perfectly fine.
Taking up purple yarn, neatly embroider a triangle inside the ear of Skitty.
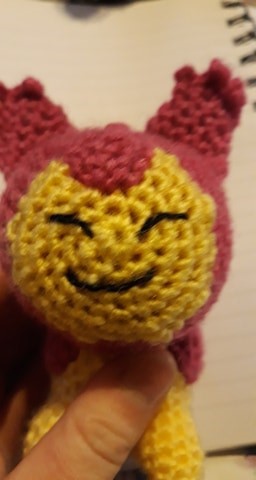
Next, it’s time for the face.
This part is very fiddly, but it’s worth it!
I started with the mouth, adding in a nose is optional but I
found it made the face a little too cramped so I left it out for my Skitty.
Finally I worked on each eye,
keeping my thread all working one way.
When you’re happy with the face, take the 3 yellow tipped pins and stick them in Skitty’s tail to complete it.
The pins are optional and only intended for display purposes, do NOT use pins if you're making this as a toy for a child! Instead whip up some tips using crochet chains or other craft objects such as buttons and craft wire.
Then that’s it!
You’re done!
Enjoy your new Skitty!
STEP BY STEP TUTORIAL
Coming soon!
If you have any questions about this pattern, feel free to contact me.
This pattern is property of BlueFoxPaws. Please do not claim or resell this pattern as your own. You can sell the finished product as long as credit is given -BlueFoxPaws-.
Leave a Reply