
MONSTER HUNTER WIGGLER PATTERN
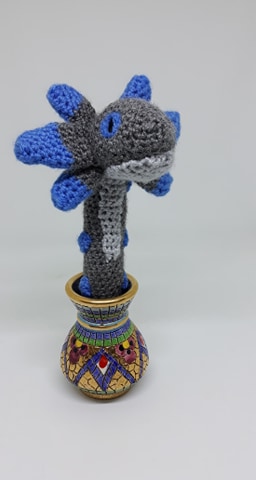
Oh the Wiggler. I must admit I'm a Monster Hunter World "baby" as we're called - with that game being my first to play in the franchise.
Well what can I say... I got to the corral highlands and saw a Wiggler for the first time and I cant even describe the noise I made, all I can say is I *knew* I needed a Wiggler in my life. In the game I stalked them and lived amongst them for hours in-game and then I saw their QUEEN. Yes I caught her and I have as many Wigglers displayed in my little house as possible in the game.
And real life.
I've made a small army of Wigglers and my army is ever growing! Whenever I lose my crojo I just whip up a Wiggler and go charity shop hunting for pots.... nothing can stop the army of Wigglers.
Where to find the Wiggler pots? Charity / thrift stores!!
Printable PDF version of this pattern available in my Etsy Store
Materials:
4mm crochet hook
4mm yarn in dark grey, light grey and light Blue
Toy stuffing
Tapestry / Embroidery needle
Optional for the eyes blue buttons, yarn fibre (to needle felt) or felt and glue. I will provide crochet eye instructions in this pattern.
Abbreviations
SC – Single Crochet
INC – Increase
DEC – Decrease
** - Repeat around
Pattern
Head, Body and Tail -
Dark Grey
Stuff this piece as you go.
Magic Ring 6 (6)
1 Inc around (12)
2 Sc around (12)
3 *sc, inc* (18)
4 Sc around (18)
5 *2 sc, inc* (24)
6 *3 sc, inc* (30)
7 – 12 Sc around (30)
13 *3 sc, dec* (24)
14 *2 sc, dec* (18)
15 – 51 Sc around (18)
- I
recommend leaving a stitch marker in every 5th round to help keep
count.
52 *sc, dec* (12)
53 – 56 Sc around (12)
57 Dec
around (6)
- Finish off, finish
stuffing and tie end neatly closed
Body spots (x6) - Light Blue
Magic Ring 6 (6)
- Finish off, leave a long tail for sewing
Neck Feathers (x4) (medium) - Light Blue
Magic Ring 6 (6)
1 *sc, inc* (9)
2 Sc around (9)
3 *2 sc, inc* (12)
- change to dark grey -
4 – 5 Sc around (12)
6 *2 sc, dec* (9)
7 Sc around (9)
- Finish off, don’t stuff and leave a long tail for sewing
Neck Feathers (x2) (large) - Light Blue
Magic Ring 6 (6)
1 *sc, inc* (9)
2 Sc around (9)
3 *2 sc, inc* (12)
4 Sc around (12)
5 *3 sc, inc* (15)
- change to dark grey -
6 – 7 Sc around (15)
8 *3 sc, dec* (12)
9 *2 sc, dec* (9)
- Finish off, don’t stuff and leave a long tail for sewing
Chin - Light Grey
This piece is worked in the FLAT, don’t forget to CHAIN
ONE TURN at the end of each row.
Chain 5, sc in 2nd loop from the hook and sc back down to
the start. (4)
1 inc, 2 sc, inc (6)
2 inc, 4 sc, inc (8)
3 – 6 Sc across (8)
7 dec, 4 sc, dec (6)
8 dec, 2 dc, dec (4)
9 sc, dec, sc (3)
10 – 23 Sc across (3)
24 sc, dec (2)
- Finish off, leave a very long tail for sewing
OPTIONAL EYES (x2) - Light Blue
Magic Ring 10 (10)
- Finish off, leave a long tail for sewing
Assembly
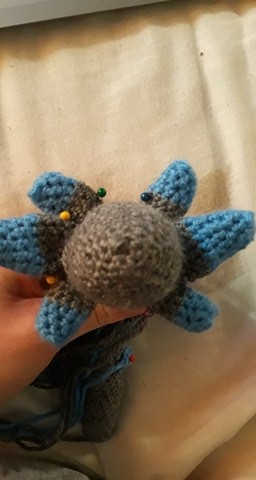
You may wish to pin the entire Wiggler together to get a feel for placements before you start sewing, this is what I always do as I find the feathers can be a bit fiddly at times.
Start with the feathers.
Pin the Neck Feathers to the neck with 3 on each side - two medium and one large in the middle. Set the medium feathers slightly behind the large one. When they are in place and you're happy, sew them on. I found a whip stitch to be the best method here.
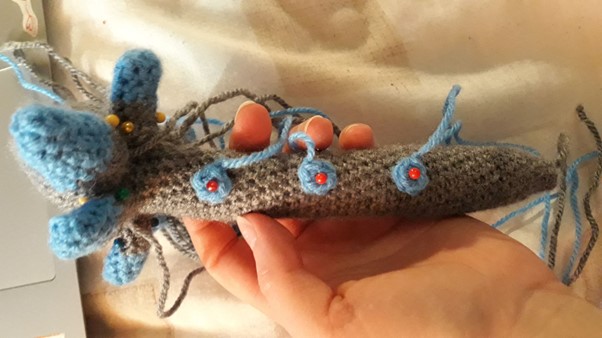
Next, carefully pin 3 spots down each side of the Wiggler and line them up as much as possible. When these are in place, sew them neatly on.
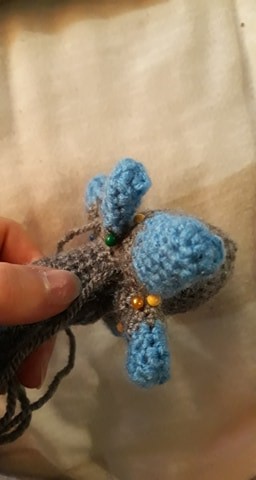
Take up the chin and carefully pin it to the head of
the Wiggler, with the neck running between the feathers. The bottom of the neck
should end up just below the middle blue body spots.
When you’re happy with the placement, sew it on
neatly.
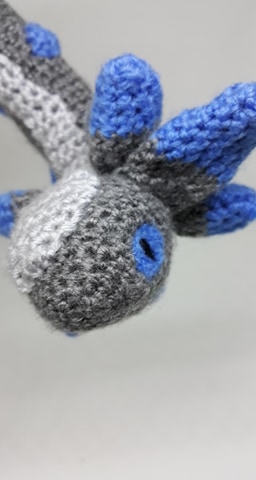
Finally the eyes.
Take up the crochet eyes and pin them in place either side of the head. When you're happy with the placement sew them on neatly. For the pupil, take up a long strand of black yarn and embroider the pupil - I used two strands of yarn to get the desired width of my modern Wigglers.
If you wish to use alternate methods for the eyes, worth them in place.
Then that's it!
You're done!
Enjoy your new adorable Wiggler!
*The photos of my original Wiggler on this page have needle felted eyes.
STEP BY STEP TUTORIAL
Coming soon!
If you have any questions about this pattern, feel free to contact me.
This pattern is property of BlueFoxPaws. Please do not claim or resell this pattern as your own. You can sell the finished product as long as credit is given -BlueFoxPaws-.
Leave a Reply